Padlet Tutorials:
Padlet Basics
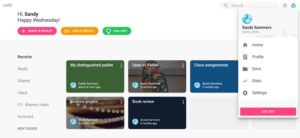
How to Create an Account
New Users – Students
- Sign up for a Padlet.com account with your WashU email address to access the institutional account.
New Users – Faculty
- Sign up for a Padlet account at padlet.com/wustl. Make sure to use your WashU email address to access the institutional account.
- Email ctl@wustl.edu and request instructor access level.
Existing Users (from wustl.padlet.org)
Note: Padlet moved our institutional URL from wustl.padlet.org to padlet.com/wustl on Sept. 03, 2025. When you first log in on padlet.com/wustl, you will be asked if you want to transfer your padlets from wustl.padlet.org. Click yes! If you skip this step the first time, you’ll have to manually transfer your padlets later. If you do choose to skip this step the first time, you can follow these steps to transfer your padlets later:
- Click on your account name/avatar in the upper-right corner of your dashboard.
- Click on your personal account from the user menu.
- Find the Made by me folder on the left-hand side of your dashboard and open it.
- Click the vertical three-dot ellipsis (…) button on the padlet’s thumbnail and select Transfer padlet.
- Choose your Padlet for Schools account from the list, and the padlet will automatically transfer.
Existing Users (Personal Padlet account with non-WUSTL email)
If you have a personal Padlet account and would like to transfer your padlets to your WUSTL account, follow the instructions below.
- Click on your account name/avatar in the upper-right corner of your dashboard.
- Click on your personal account from the user menu.
- Find the Made by me folder on the left-hand side of your dashboard and open it.
- Click the vertical three-dot ellipsis (…) button on the padlet’s thumbnail and select Transfer padlet.
- Choose your Padlet for Schools account from the list, and the padlet will automatically transfer.
- If you are a faculty member, make sure to email ctl@wustl.edu and request instructor access level.
Note that importing Padlets will cause changes to the links, so you should check places where you have shared a Padlet link or embedded a Padlet.
If you have issues setting up your account, please contact ctl@wustl.edu.
How to Make a Padlet
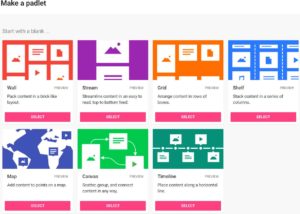
- From your dashboard, click the pink Make a Padlet button.
- You will then choose the type of padlet you want to make: wall, stream, grid, shelf, map, canvas, or timeline.
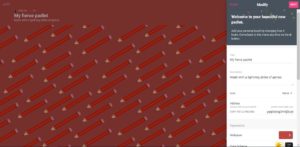
- A new Padlet with an automatically generated Title and Description will be created for you.
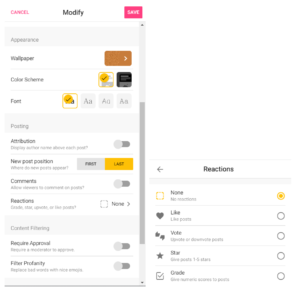
How to Modify your Padlet
- If you modify sidebar is not open, double-click on the title or click the gear icon on the top right to open your settings.
- Update your settings, including Title, Description, and more.
- Consider activating comments and reactions so that students can engage with each others’ posts.
- Comments allow users to write comments under each post.
- Reactions allow users to like, vote, star, or grade posts.
How to Share your Padlet
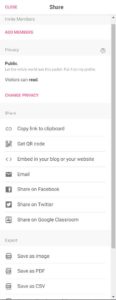
- Click Share on the top right.
- Similar to Google applications, you can add collaborators with the Add Members option.
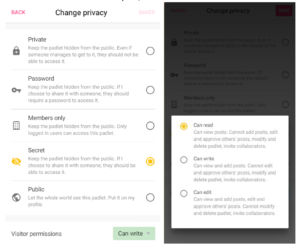
- You can also choose a privacy setting: Private, Password, Secret, and Public. Learn more about those here.
- Students will not need an account if you use Password or Public.
- Recommendation: Use Password if there is sensitive information (e.g., critique, reflections) and Public for anonymous discussion with no identifiers (e.g., wiki about content, general feedback, brainstorming)
- You can also choose what users can do after viewing your padlet: can read, can write, can edit.
- To allow students to post, choose “can write”:
- To share with students, you can either share the Padlet link or Embed the padlet into a Canvas page.
-
- To share the link, click Copy link to clipboard.
- If you set a password, make sure to copy this as well and share with students.
- Suggestion: Test out your padlet in an Incognito or Private window to make sure your students can access and write posts on your padlet.
- To share the link, click Copy link to clipboard.
-
- To embed into Canvas, click Embed in your blog or your website.
- Copy the block of HTML text.
- Open the Canvas page you want to add this padlet to.
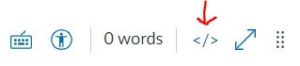
- In the text editor, click the HTML button (</>) in the bottom right of the text box.
-
- To embed into Canvas, click Embed in your blog or your website.
-
-
- Paste the HTML text from Padlet into the box.
- Click the HTML button again.
- The padlet will now load in the text box.
-
How to Test/Use your Padlet
- To test your privacy settings, copy the link for your Padlet and open it in a Private or Incognito window of your web browser.
- Add a post by double-clicking in the board or clicking the pink + button in the bottom right corner of the screen.
- You can also try other features: Move posts around, add multimedia, react, add comments, delete posts, change their colors, and more!
- For more information on adding posts to a padlet, see: https://padlet.help/l/en/get-started/how-to-add-a-post-to-a-padlet
How to Manage Padlets using the Dashboard
- Get to your Dashboard from any padlet by clicking “padlet” in the top left corner.
- Create folders or archive padlets in your Dashboard to clear out your Dashboard.
- You can favorite or “like” padlets by clicking the heart in the top right corner of any padlet. You can then find these padlets on your Dashboard by clicking Liked.