Panopto Tutorials:
Panopto Online
A tutorial on how to navigate the Panopto web interface.
Accessing Panopto Online
- Go to the Panopto tab in a course and click on the “Open in Panopto” icon at the top right:

↳ NOTE: If you’re a Firefox user, the app will not automatically redirect you:- You will be asked to sign in. Make sure “My-Canvas” is selected from the dropdown and then click on sign in:

- You will be asked to sign in. Make sure “My-Canvas” is selected from the dropdown and then click on sign in:
- Alternatively, you can access the Panopto web interface by logging in at: https://washu.hosted.panopto.com
The Create Button
One of the first things you will see in the Panopto web interface is the ![]() button that will offer you the following options:
button that will offer you the following options:

Panopto for [Mac/Windows]
This option allows you to create a recording using the Desktop app. You can find our tutorial here:
- Mac: https://ctl.wustl.edu/panopto-tutorials-create-mac/
- Windows: https://ctl.wustl.edu/panopto-tutorials-create-windows/
Panopto Capture
This option allows you to create a recording using the web recorder. You can find our tutorial here: https://ctl.wustl.edu/panopto-tutorials-capture/
Upload Media
This option allows you to upload media from your computer to Panopto:
- Make sure you have selected the desired folder from the drop-down menu:

- You can now either choose to drag and drop the media within the dashed lines or click within the dashed lines to bring up a window and select a file from your computer:

Webcast
This option allows you to create a webcast:
NOTE: Viewers will experience a delay of approximately 30 seconds when webcasting. If you want the webcast to be highly interactive, consider using another solution such as Zoom instead.
- Fill out the necessary information and then click “Create”:

- On the next page, you will be able to:
- Make changes to the webcast’s information.
- Copy the link to your webcast:

- Start the webcast:
- Click on “Record” to be redirected to the Panopto Desktop app:

- Select your audio, camera and screen-sharing settings and then click “Record” to start:

- You will be able to see real time comments on the webcast page:

- Click “Stop” to pause:
- Click on “Record” to be redirected to the Panopto Desktop app:
↳ You can return to this page by clicking on the settings icon on your webcast in the web interface:

↳ Your webcast will be automatically recorded and saved to the folder you previously selected.
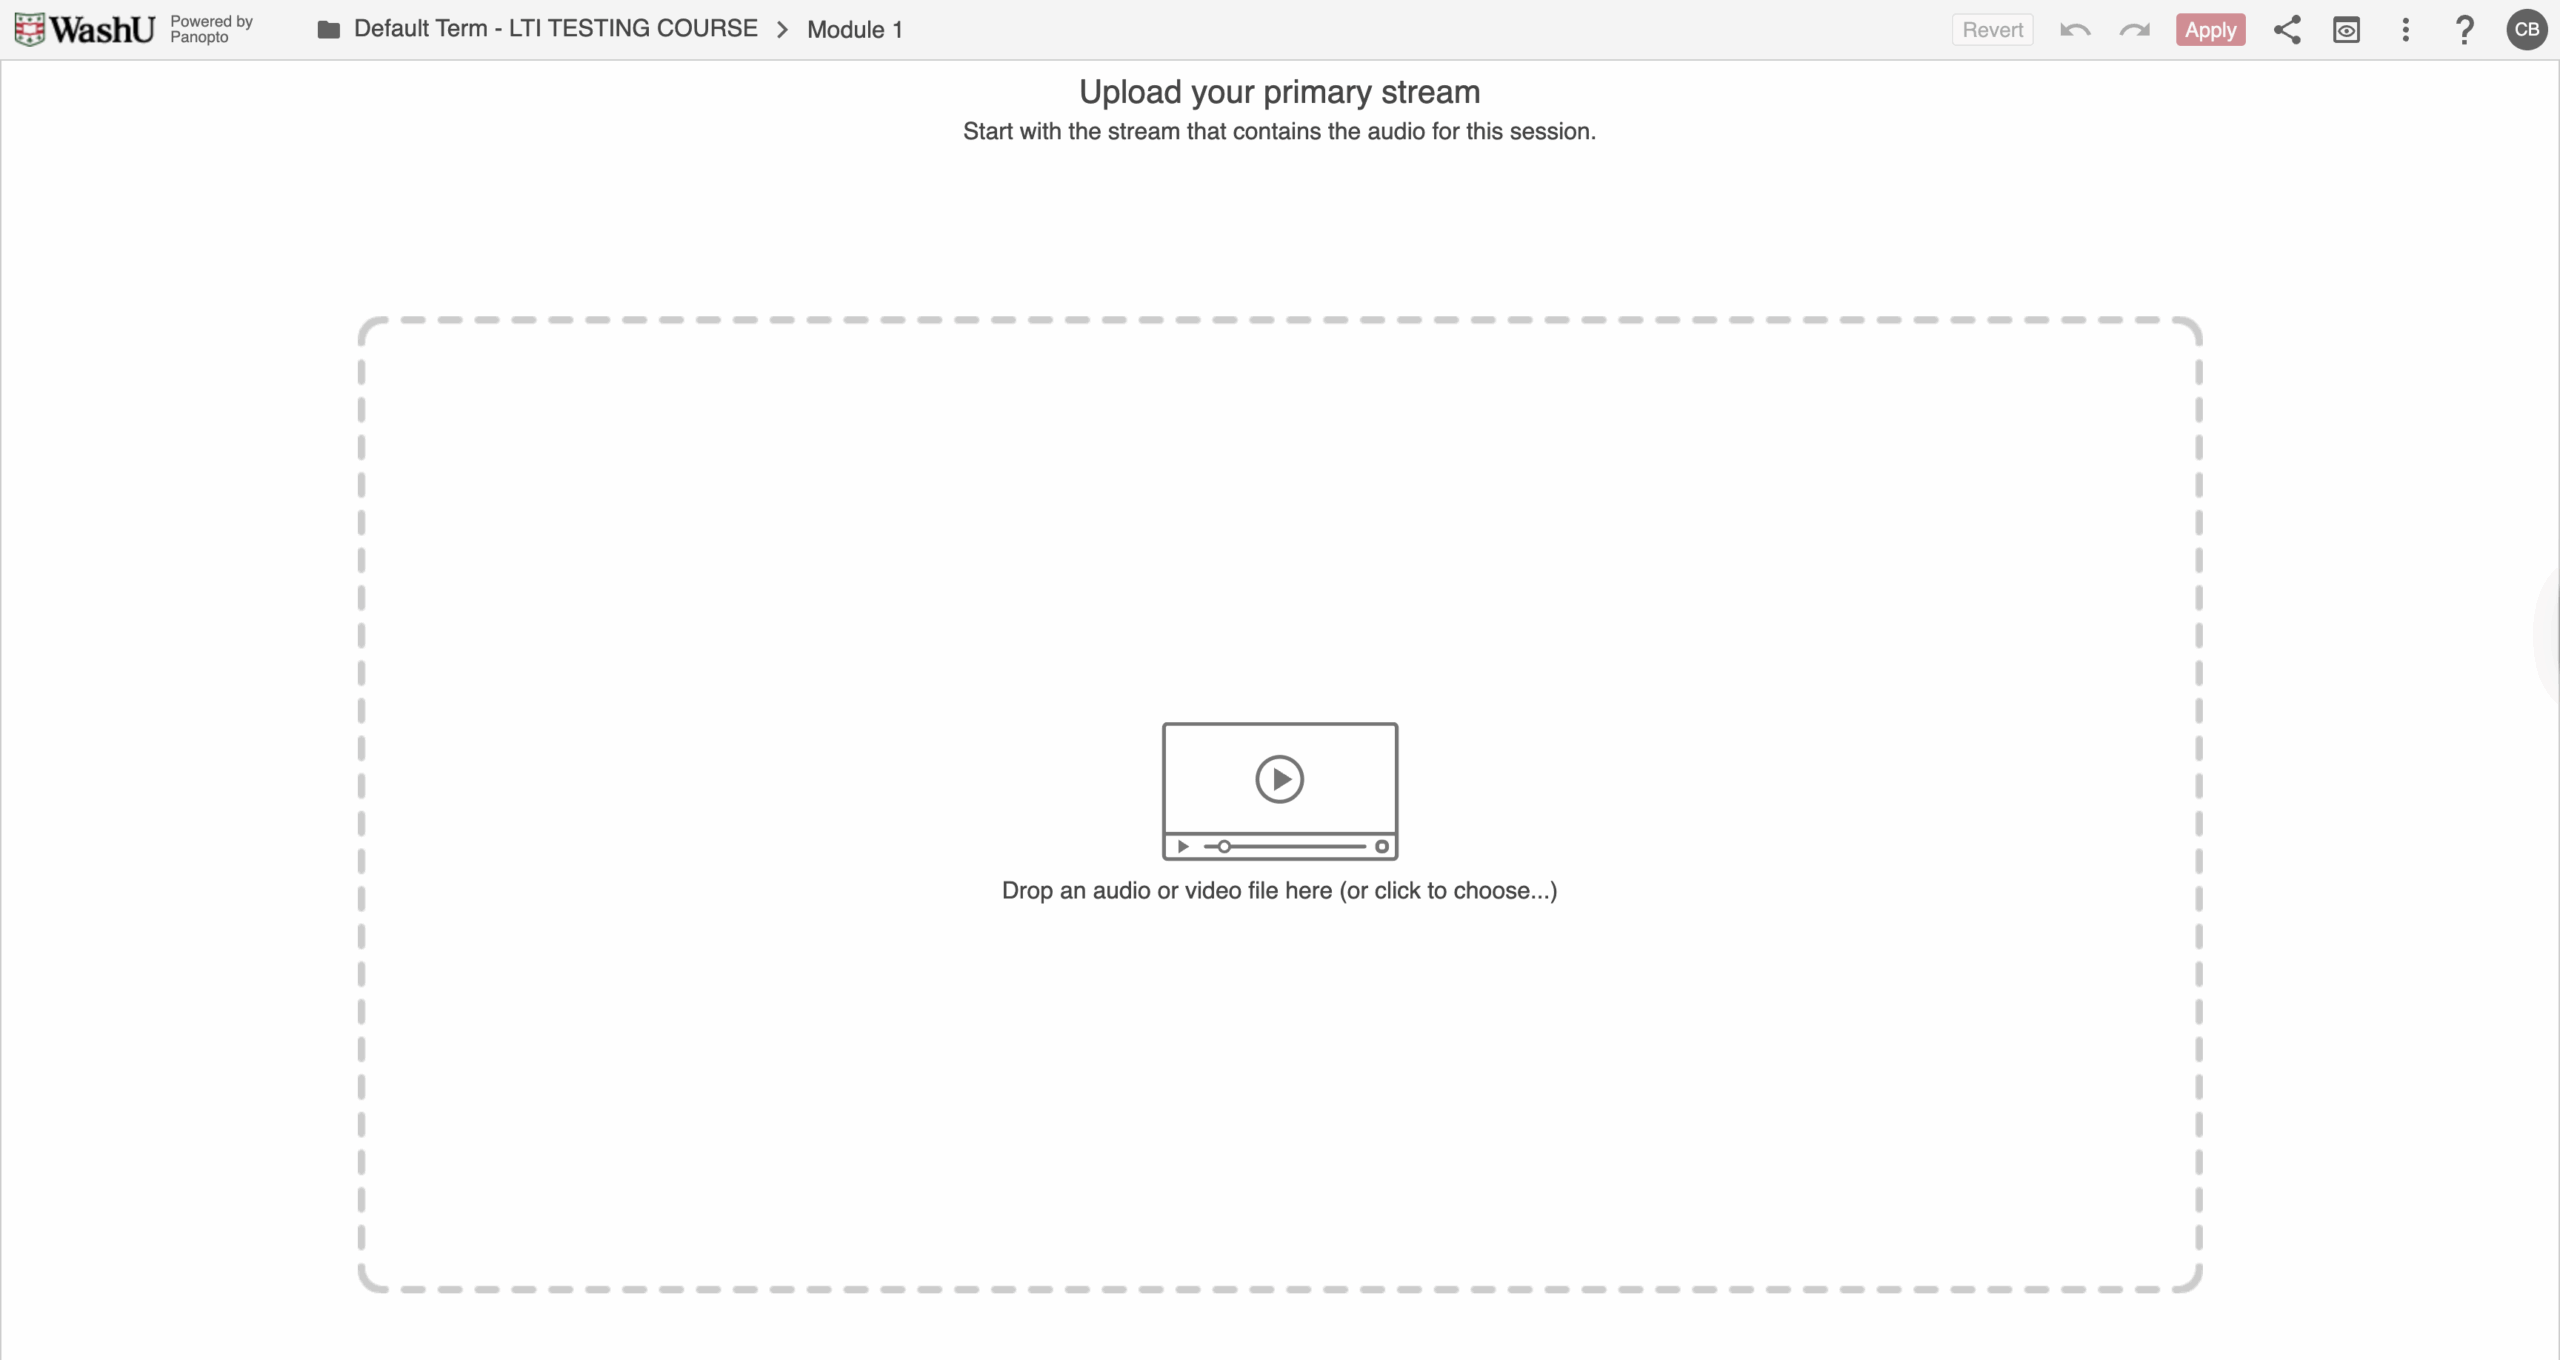
Build a session
This option allows you to create a session, which allows you to upload multiple video and presentation files together. Think of it as building a dynamic presentation:
- Fill out the information and click “Create”:

- Start by adding your primary video or audio source by either dragging and dropping the file within the dashed lines or clicking within the dashed lines to open the file explorer:
- This first source is usually video or audio of the presenter and appears on the upper left side of the Panopto player.
- This first source is usually video or audio of the presenter and appears on the upper left side of the Panopto player.
- Once you have added a primary video, you will be given the option to Drop another primary audio, video, or other file on the left side or Drop a secondary video or PowerPoint file on the right side:
- Secondary videos appear on the right side of the Panopto player and usually contain the content that is being presented.
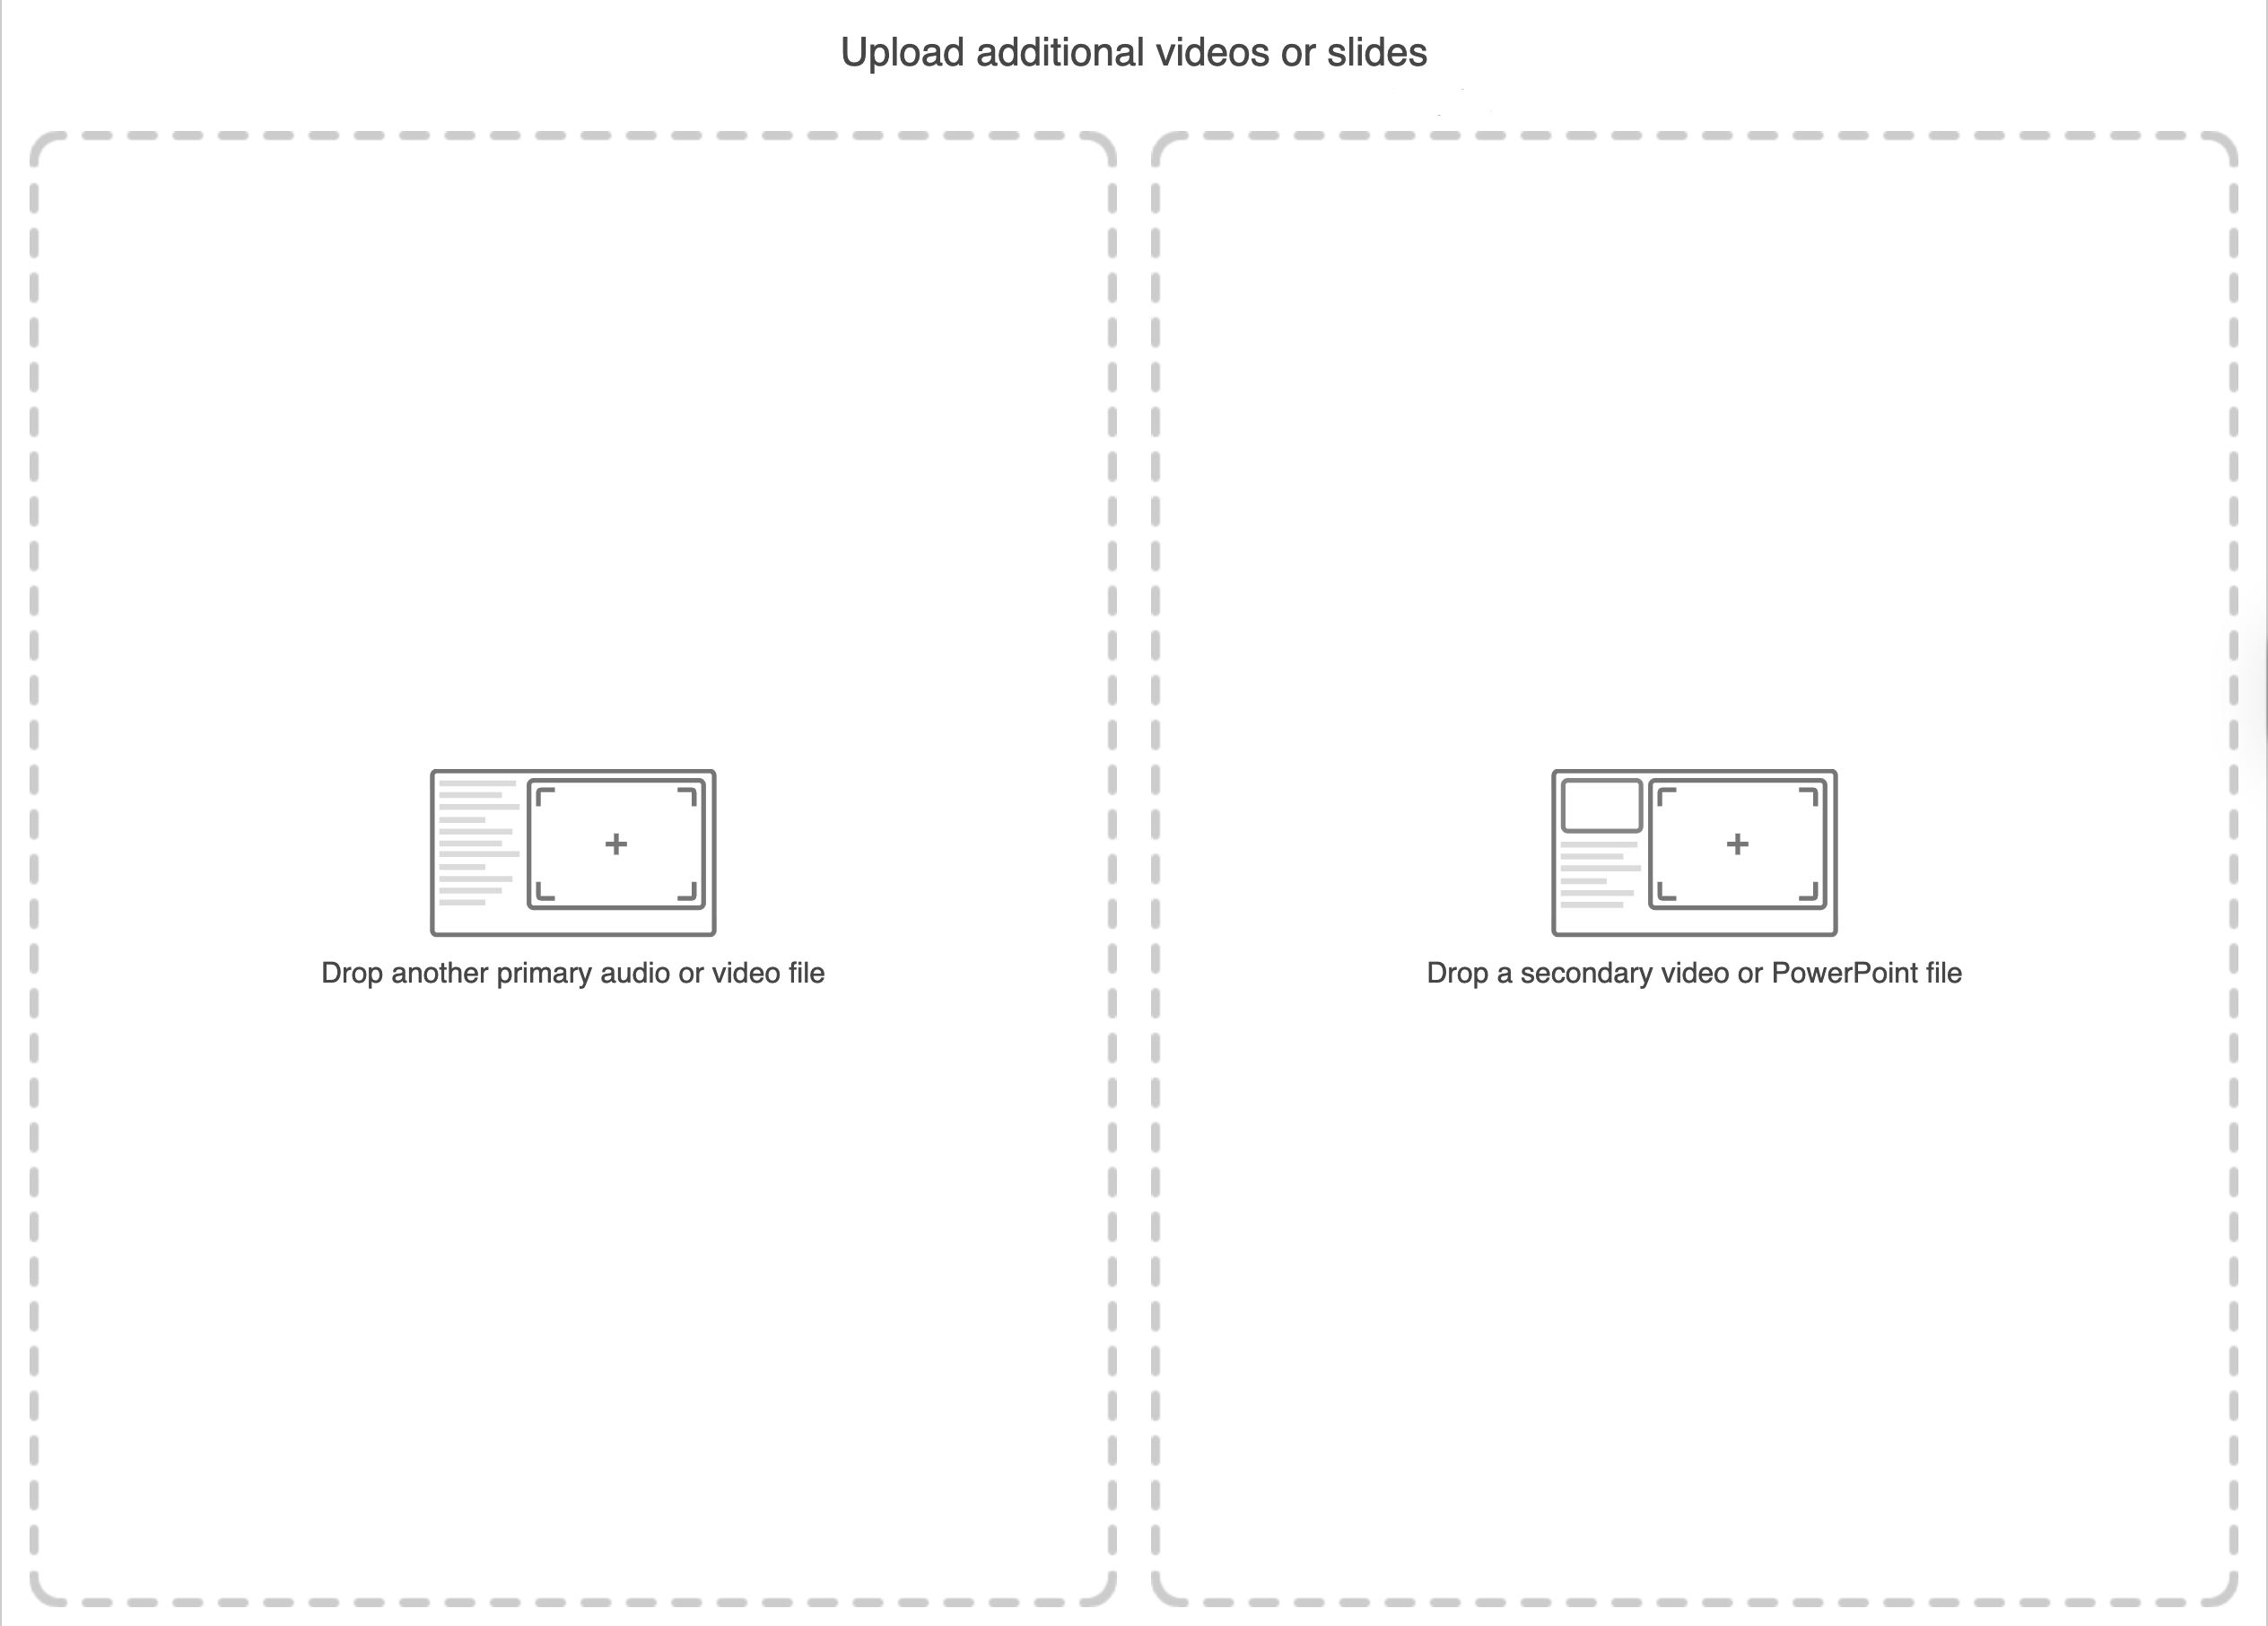
- Secondary videos appear on the right side of the Panopto player and usually contain the content that is being presented.
- Once all files are added, you will be able to edit your session.
- You can learn more about editing in our tutorial: https://ctl.wustl.edu/panopto-tutorials-edit/
- Once you are done, click “Apply” at the top of the page:

Playlist
This option allows you to create playlists. You can learn more about playlists in our tutorial: https://ctl.wustl.edu/panopto-tutorials-playlist/
New Folder
This option allows you to create a new folder:
- Fill out the information and then click “‘Create Folder”:

- To manage your folder, click on the “More Actions” icon (three vertical dots) while in the folder:

Navigation
Search Bar
Use the search bar to search through your Panopto library:

You will see videos where the word you searched appears in the title. You will also see results if the word was spoken, shown on screen, or shown in slides in a video. You will see where in the video the word appears by looking in the search results below the video title.

Sort & View
You will find options for sorting and viewing on the right side of the screen:

- The down arrow on the left allow you to sort by:
- Name
- Duration
- Date
- Folder
- Rating
- The three icons on the right allow you to change the views to:
- Grid View
- List View
- Table View
Sidebar
The sidebar navigation will let you access the following:

- Home: A dashboard that will display videos that were shared with you, recently added or recently viewed by you.
- Note that you cannot access media settings from this page. Clicking on a video will take you to the viewer in a different tab.
- My Folder: This is your personal folder. Every user has one by default.
- Subscriptions:Will let you see content from users, folders or tags you are subscribed to.
- Learn more about subscriptions here: https://support.panopto.com/s/article/How-to-Subscribe-to-a-Video-Creator-Folder-or-Tag
- Shared with me: Will display videos that have been shared with you by other users.
- Everything: Will show you every file that is connected to your account.
- Browse: Will let you browse or search through any folder you have access to.

Managing Media
Individual Files
When you hover over a file, you will see the following options:

- Clicking on the
 Settings icon will take you to the Settings page where you will be able to modify the media’s metadata and other features:
 - The
 Share icon will take you to the Sharing options for your media.
 - The
 Edit icon will take you to the online editor.
- Learn more about editing in our tutorial: https://ctl.wustl.edu/panopto-tutorials-edit/
- The
 More Actions menu offers additional options:
- Edit takes you to the online editor: https://ctl.wustl.edu/panopto-tutorials-edit/
- Rename allows you to rename your media.
- Share takes you to the sharing options for your media.
- Resume allows you to continue recording a video either in the desktop app or the online recorder:
- Learn more about recording with the Desktop App:
- Learn more about recording with Panopto Capture: https://ctl.wustl.edu/panopto-tutorials-capture/
- Move allows you to move your media to a different folder.
- Copy link copies a sharing link for your media to the clipboard. You can then paste it to share with others.
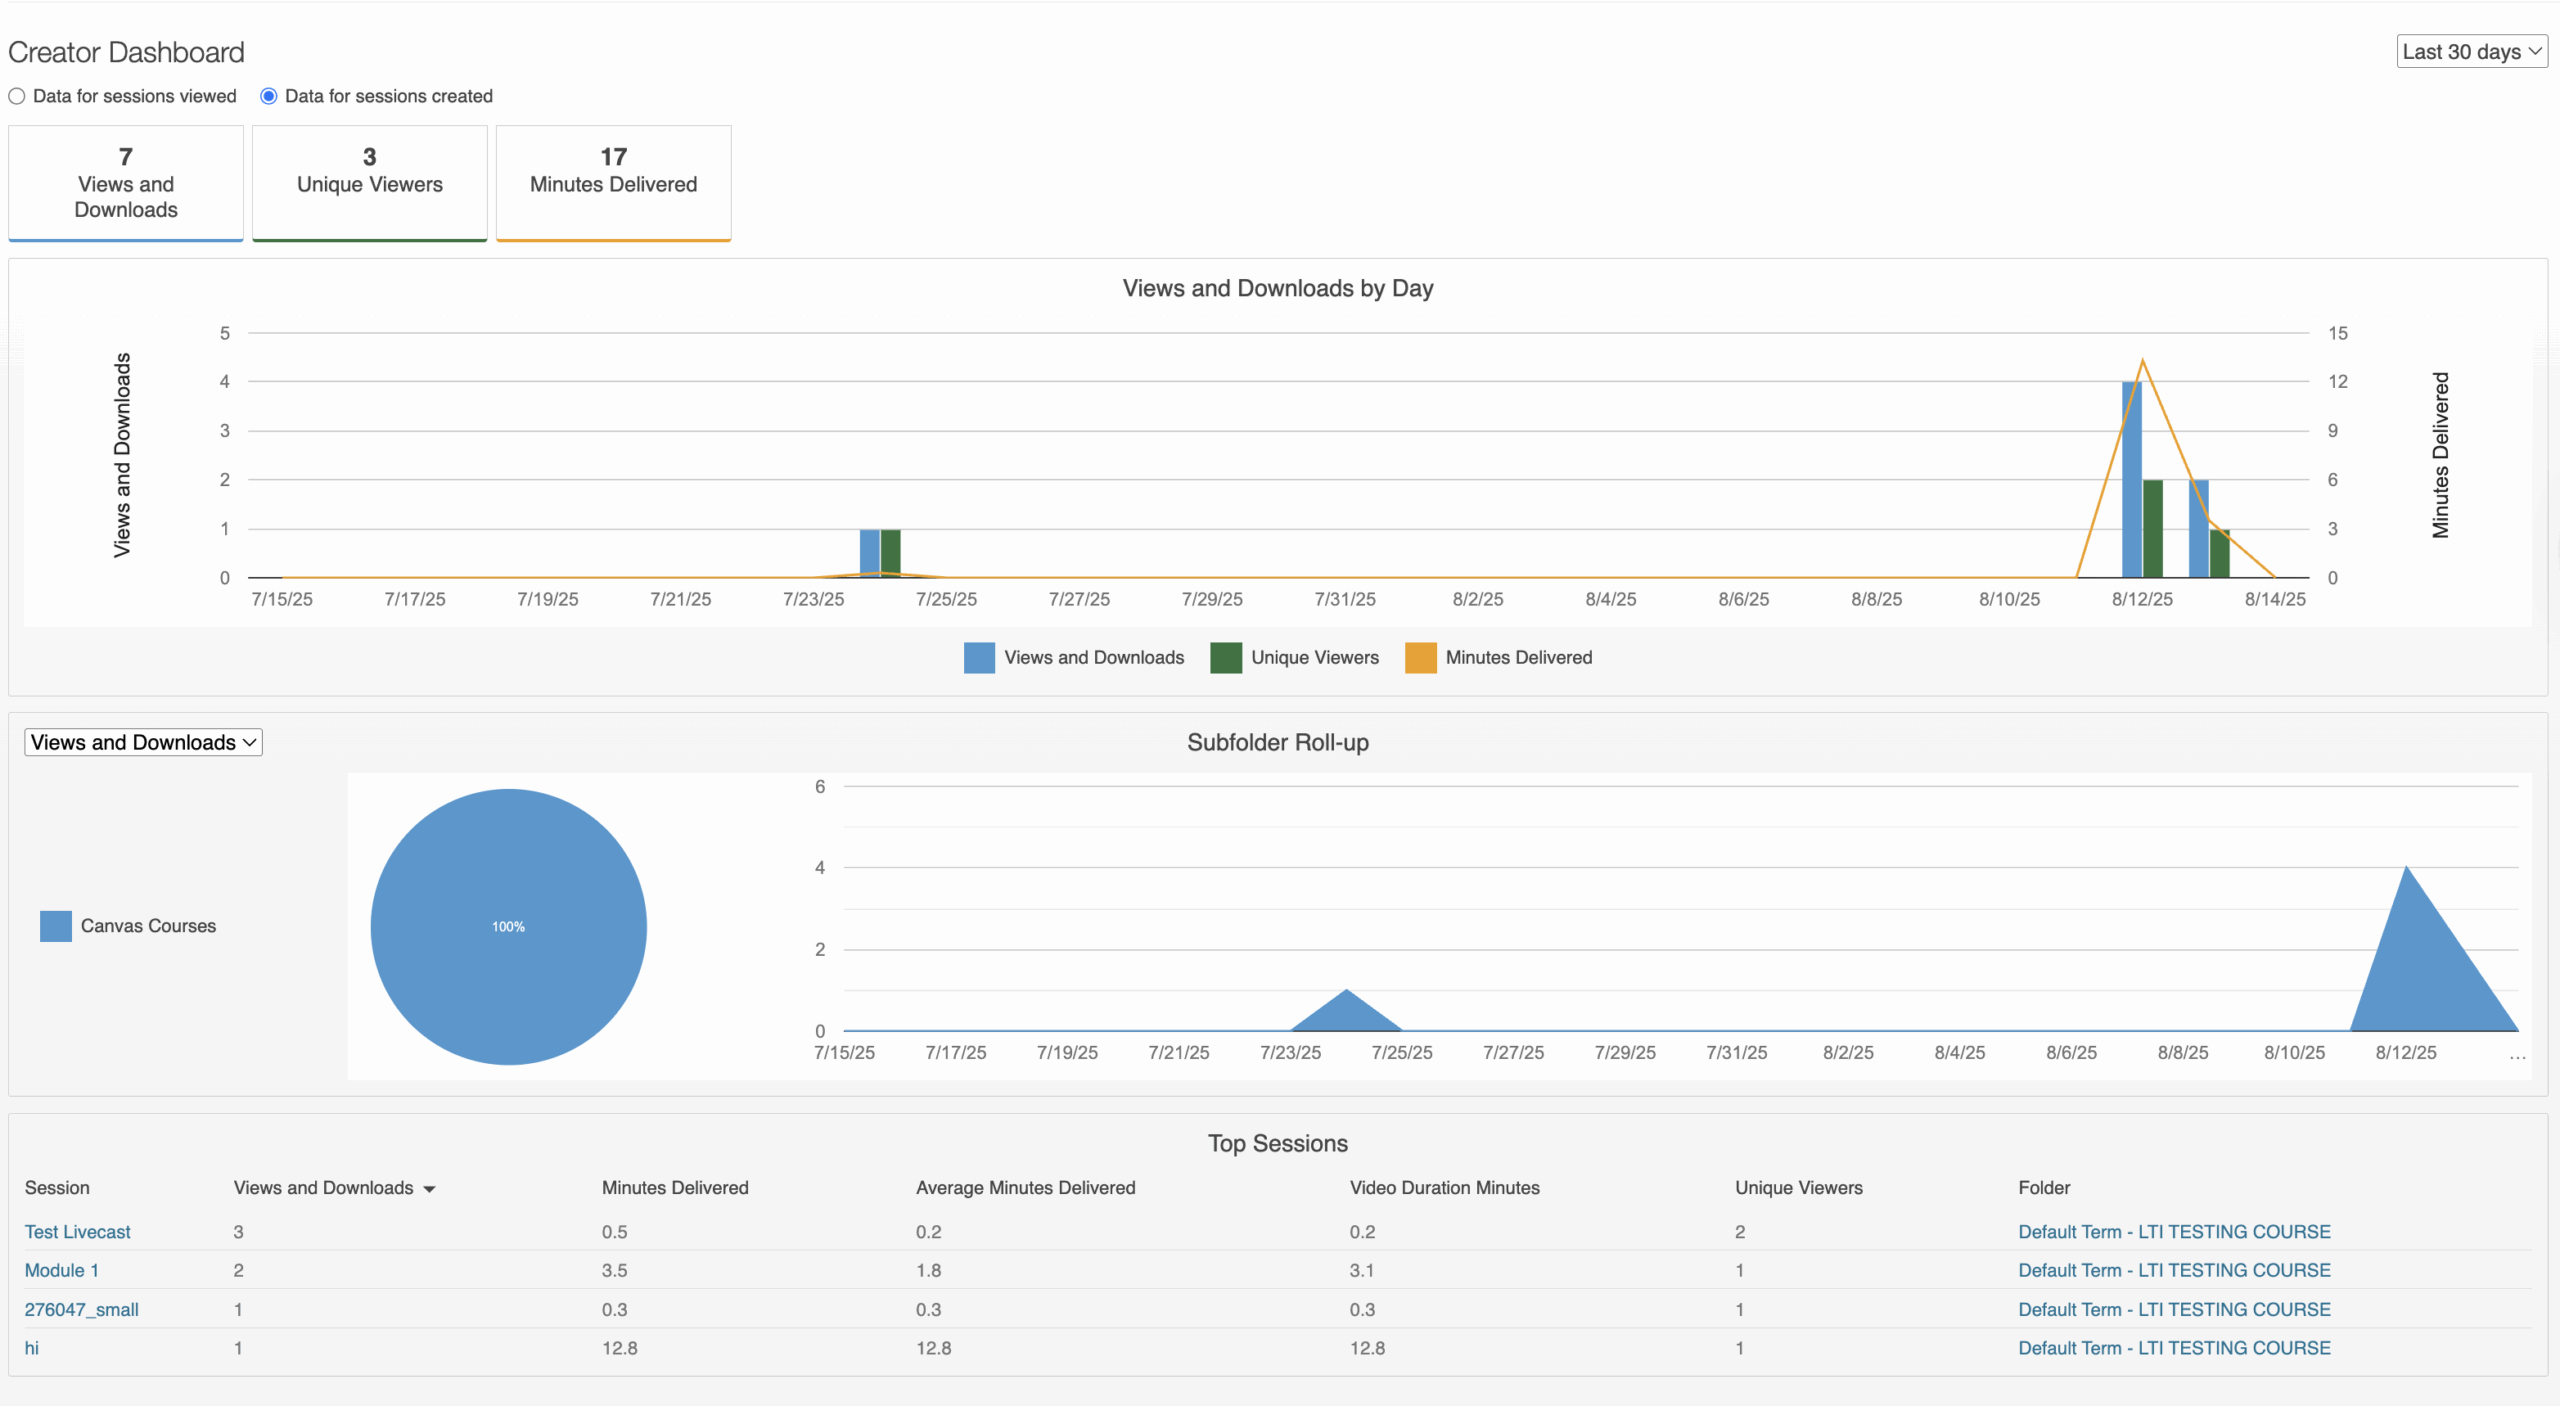
- Stats will show you the viewing analytics for your media: https://ctl.wustl.edu/panopto-tutorials-analytics/
- Delete will delete your media file.
Bulk Managing
Select All
To select all media in a folder, check the topmost box:

Sharing Media
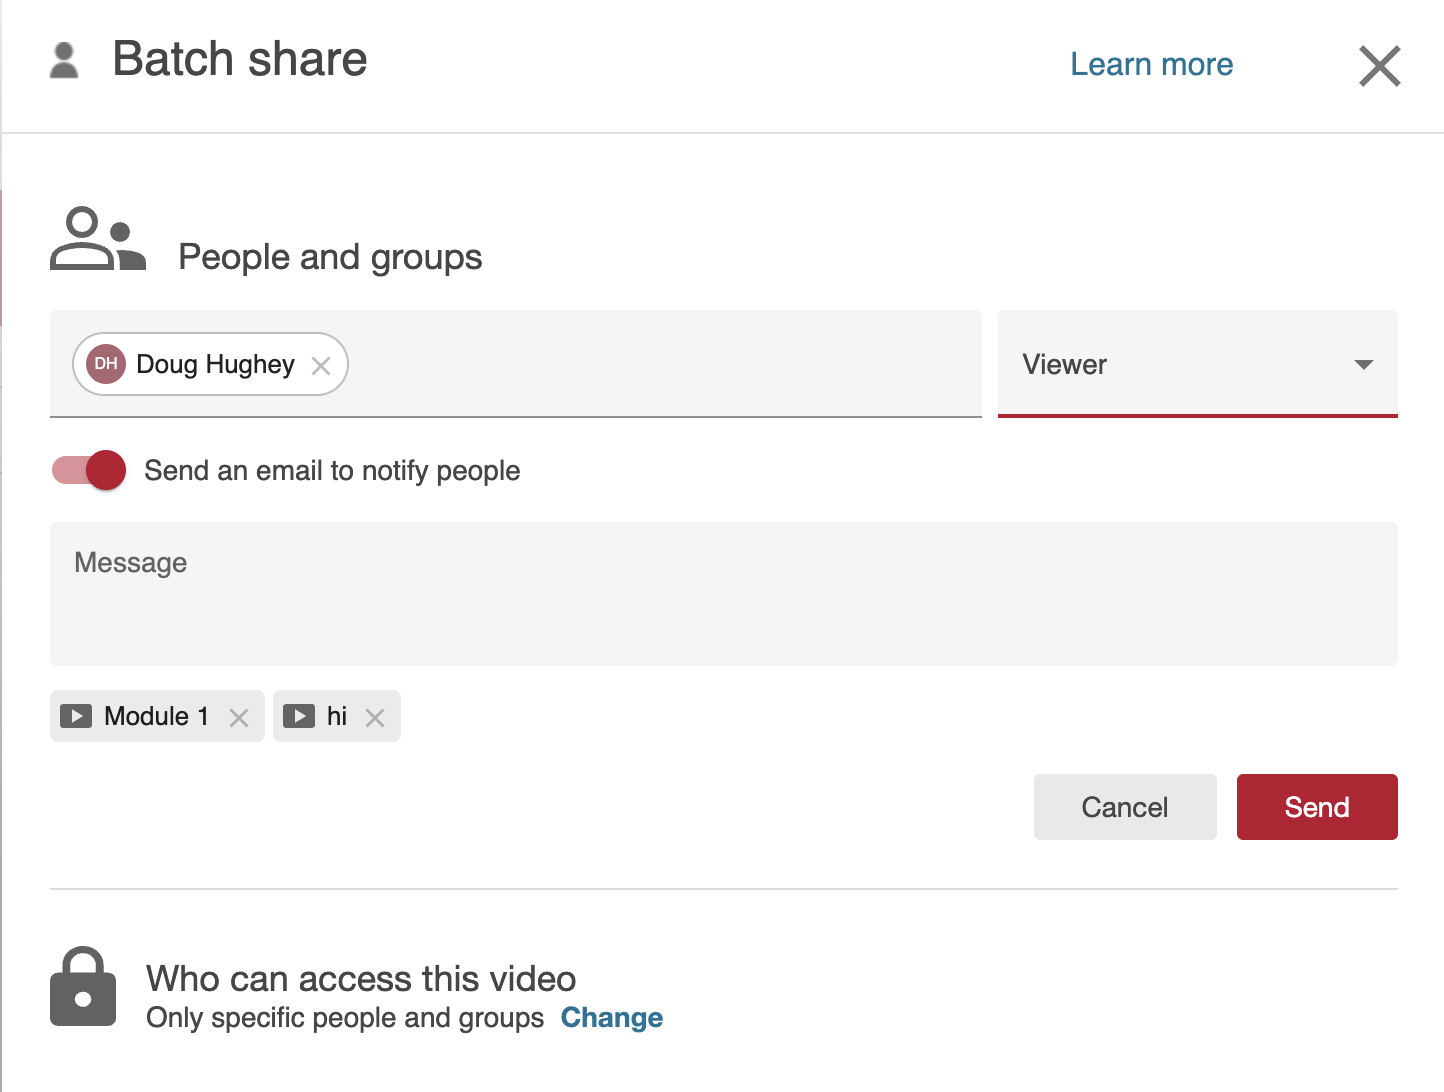
- Select the recording(s) you want to share and then click on the “Share” icon:

- Add the users you want to share with and then click “Send”:
Deleting Media
- Select the recording(s) you want to delete and then click on the “Delete” icon:
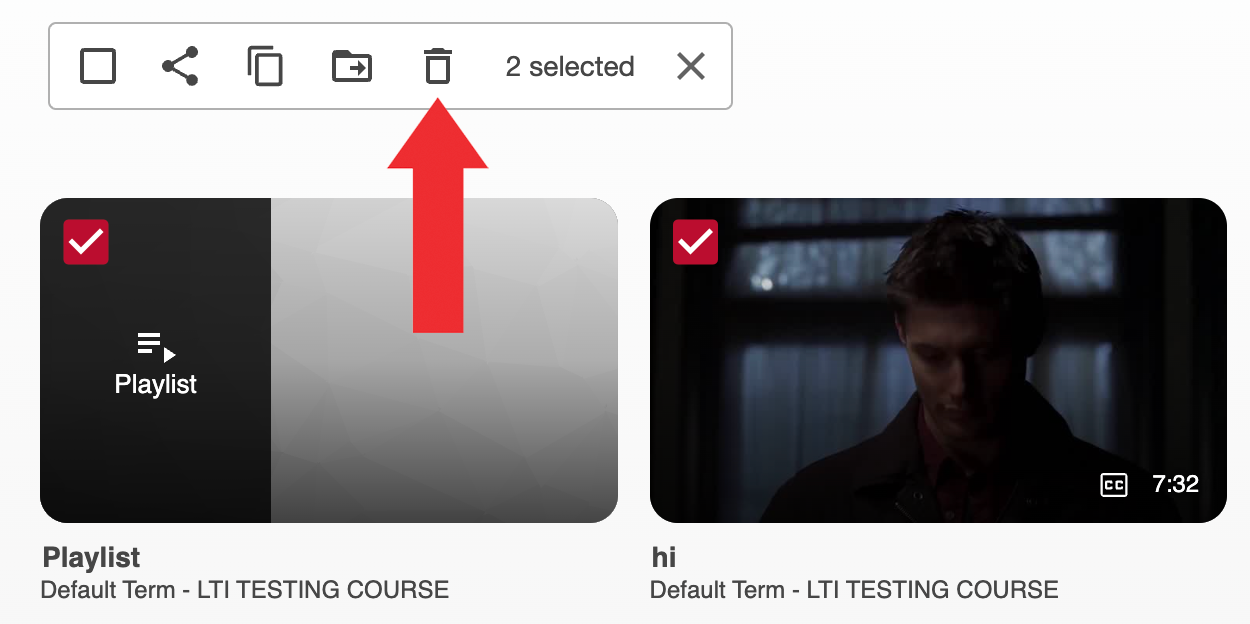
- Click “Ok”:

↳ You can restore deleted media by clicking on “System” at the bottom of the left navigation menu and then clicking Recycle Bin:

Moving Media
- Select the recording(s) you want to move and then click on the “Move” icon:

- Select the desired folder from the drop down and click “Move”:

Copying Media
Alternatively, you can choose to copy your videos into the folder instead. This allows you to keep the original in the current folder while adding a copy to another folder.
- Go to the desired course folder and select the recording(s) you want to copy and then click on the “Copy” icon:

- Select the desired folder from the drop down and click “Copy”:

Analytics
You are able to see your analytics in the “Everything” page by clicking on the Stats icon at the top right corner:

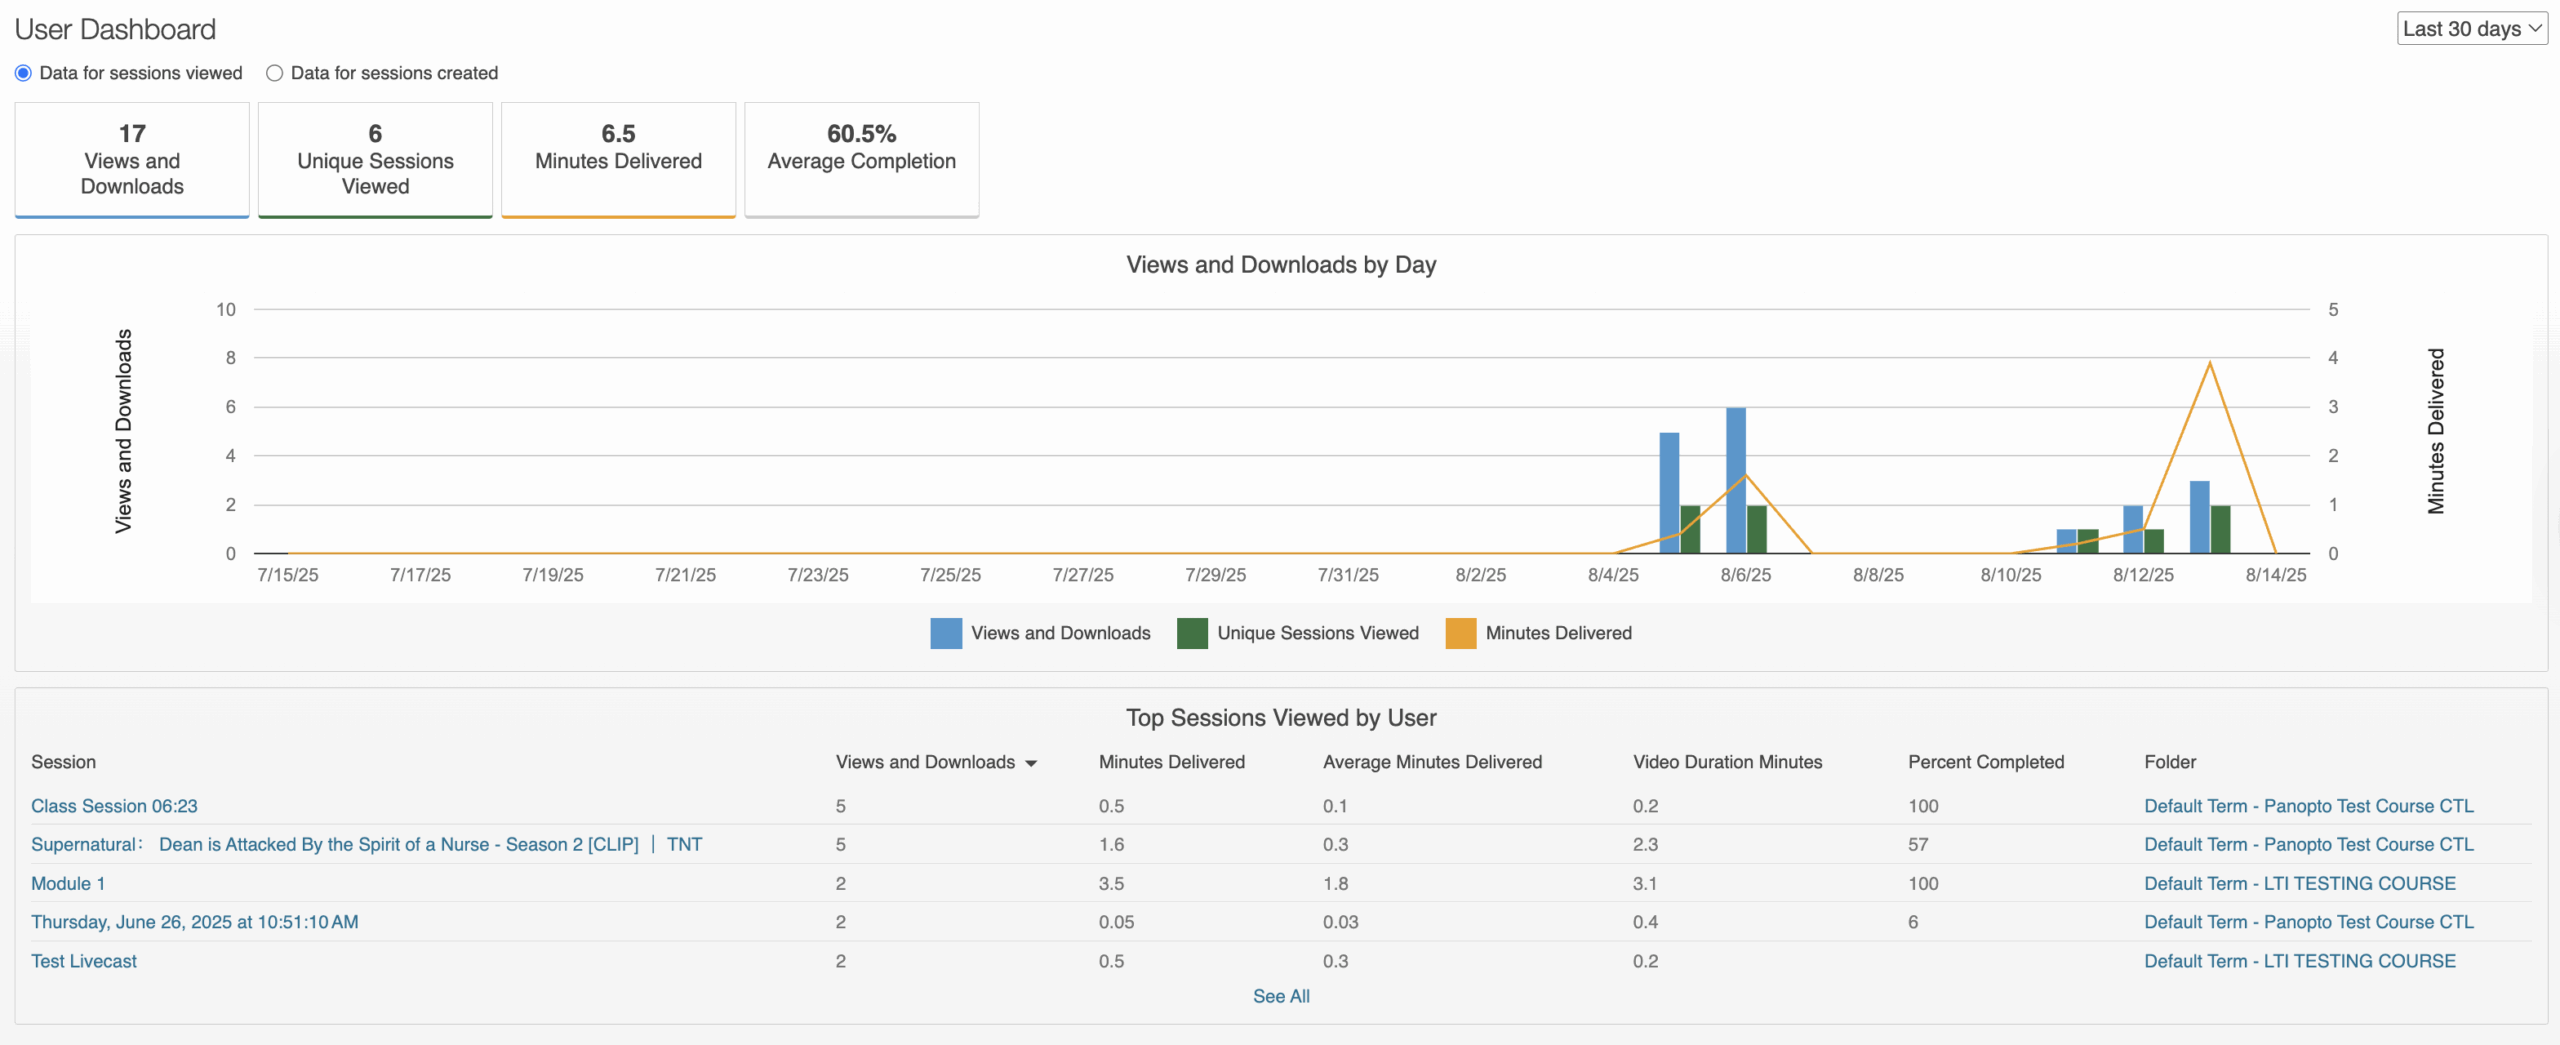
User Dashboard
The user dashboard gives you the ability to see viewing statistics for videos you have viewed.
↳ You can learn more about viewer statistics here: User Dashboard
Creator Dashboard
The creator dashboard gives you the ability to see viewing statistics for videos you have created.
↳ You can learn more about creator statistic here: Creator Dashboard